free website stats program SE compensator problems | Page 6 | Harley Davidson Forums

SE compensator problems

Should be quite straight forward this time; don’t think you really need to pull the clutch basket?

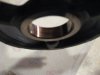
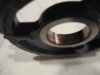
I did not remove the clutch basket on mine. Actual R&R of the sprocket was less than hour. No point in matching sprocket to chain, but chain (if removed) should go in same direction. I re-used my primary cover gasket and have no leaks. It really was a snap. Used a 1/8" round ball carbide bit. Took 10 minutes per groove by hand.
 
I have a SE compensator in my 2006 dyna and want to take a look at it. Mine has around 5000 miles on it, I haven't done much work in the primary of my bike other than changing fluid. I do have a service manual and I am wondering how you remove your compensator sprocket without removing your clutch basket, any detailed info would be greatly appreciated as I see from other posts people are doing it without the removal of the clutch basket. Thanks for the info. Also can you purchase just the new SE compensator bolt as I don't want to reuse the old one and if so does anyone have the part # for the bolt.
 
does anyone have the part # for the bolt.

If you have the auto-tensioner for the primary chain like I have on my 09 Dyna, once you remove it (2 bolts) there is plenty of slack in the chain to remove the front sprocket. My SE compensator kit was 40274-08. If yours is the same, the bolt is part number #4857.
 
Thanks for the info Hoople, so if I remove the 2 bolts from the auto tensioner I will have enough slack to remove the comp sprocket. Is there any thing to look out for when I reinstall the auto tensioner? Also I do not have the locking bar that goes between the comp sprocket and the clucth sprocket can I stuff a rag between the chain and cluch basket to get the comp bolt loose?
 
Once you remove the auto-tensioner your set. When re-installing, just tie wrap the assembly after compressing the small spring. Bolt unit in and cut tie wrap to let it work.

I tried a few ways for "locking" before I made a locking tool out of some spare aluminum. Making the part is easy and works like a champ. It grabs across both rows of teeth, does not damage the sprockets and is the only way to go.

Remove the tensioner 1st. Then loosen bolt. Torque new bolt. Install tensioner last.
 
may wanna order up a couple bolts. Problem with this problem is you're going to have to get in there a couple times to verify whether this mod is a legit fix.
 
I have not Geezer. I've only got about 1000mi on mine since upgrading the comp and have a 15k service coming up in another 400mi. Going to do it at that point. I'm probably going to find me a machine shop to mill in the grooves. Curious as well what others who've done it report on their next check.
 
Thanks Hoople for all the info, just got done tearing my compensator out. I used a 1x4 wrapped in a towel as a locking tool. I cleaned up everything in the primary it is a pretty easy job to do even for a novice wrencher like me. I have a pretty stout 107" motor that is rarely below 3000 rpms and installed the SE comp. around 6000 miles ago. I ran formula+ for the first 5000 miles and spectro the last 1000 miles. My compensator definitely shows signs of fretting, it's not bad but it's there. Thanx to everyone for posting on this, I am going to order a new comp. bolt tomorrow and I will machine the three slots in it as well. I am going to switch back to formula+ when I put it back together. I will try to attach some pics of my comp.
 

Attachments

  • IMG_1195.jpg
    IMG_1195.jpg
    49.4 KB · Views: 68
  • IMG_1196.jpg
    IMG_1196.jpg
    42.7 KB · Views: 61
Back
Top