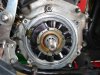
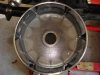
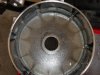
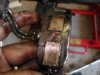
Thanks Jack gonna follow my manual values...Well I got everything off today just waiting for the new parts. The clutch and starter were fun to get off. :s I kind of modified a harmonic balancer puller to get the clutch off by adding a small piece of wood to prevent the bolts from pulling through. I attached some photos of the stator and rotor. Is it normal to have some chips on some of the magnets on the edge? I'm not sure if this is the original rotor or not. I doubt that it is. My oil didn't really smell burnt and I guess the bad spot on the stator looked like some broken insulation (pic attached).
Since my primary is at Brown's Plating I'm debating on upgrading the regulator, stator and rotor to a 32 amp vice 22 amp. I guessing the only benifit would be that I would have the extra power if I wanted to add more lights. Any recommendations? Or should I stay at 22 amps? It's not a touring motorcycle so I don't have the radio and other things on it. The only thing I'll probably add would be some LED lights.
Thanks everyone for the assistance. I'm new to working on motorcycle and am not a mechcanic but am willing to learn. Not really wanting to spend 90-100and hour for labor:swoon if I can do it myself.