These suggestions will also work on EVO carbed models too.
Here's a video on how to change the jets...
YouTube - Harley Davidson CV Carburetor Main Jet replacement‏
A tried and true for "most" carbs in twin cam bikes for rejetting with intake and exhaust mods would be on the low speed jet 45/46 (46 being the best usually), and on the high speed jet would be 185/190 (190 usually being stock). Install 2 - #4 washers (available in most hardware stores) under the main jet needle to raise it up .050 (see detail below), and readjust the idle mixture to the highest and steadiest setting, usually found about 2 1/2 to 3 turns open after LIGHTLY seating it and backing it out. This is done after the removal of the concealment plug that covers the idle screw from the factory. Care should be taken when drilling a hole to remove this concealment plug because if the drill goes through the plug and contacts the screw, it can turn the screw in and bottom it out damaging the seat of the mixture adjustment. All adjustments to mixture should be made at full operating temps. This mod will set you back about $4-$5 total..
The #46 jet is hard to find , here's a link if you need it...
Pilot Jet #46 for Keihin Carb PN 400-861
Here's a listing for the other size pilot jets too...
Motorcycle Jets J&P Cycles
This can be done without removing the carb by rotating it slightly for better access to the screws and works best with a stage 1 intake kit. Using the stock air cleaner would cause a rich condition with this procedure.
Refer to the other CV Carb posts in this area for more info and pictures of the carb to help you out here.
The installation of the washers is an easy thing to do and is pretty much straight forward. It just takes a little patients to seat the diaphragm back into the groove when you reassemble it. No experience needed, just straight forward common sense using a light handed circular motion to gather it up and drop into the groove in the carb body, You'll feel it drop in when you do it .The washers go under the ring on the needle after lifting it out of the diaphragm to raise it up in the assembly as seen in the pic at the bottom here .
I prefer not to drill the vacuum port in the slide. It can cause pop backs under certain conditions in cold weather and low RPM's.Also slide spring replacement for a weaker one or cutting the original one is also optional here.
I prefer this method to replacement of the main jet needle as not all know how to determine which needle would be the best for their application and it eliminates the guesswork. It also does not require dyno runs to validate the results. It works in most cases as a cut and dry method of getting a seat of the pants improvement without the time and expense of the DJ carb and other kits at $60-$100 and does not kill your MPG like the kits or sporty needle has done.
Some people decide to use the sporty needle # 27094-88 in their upgrade. These are my feelings on doing this. That needle comes from a carb that had NO accelerator pump and when you install it in a carb that does have an accelerator pump, it for sure will give you more fuel when you get into the accelerator circuit, but I feel it gives you too much fuel at that time and that's why I prefer the shimming with washers against the replacement of the needle to the sportster needle. The taper of the stock needle is more condusive to better mileage than the sporty needle is and if you were to ride two identical bikes with the two different setups, you really could not tell the difference.
This is how it works.
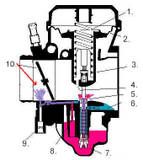
1. Slide Spring
2. Slide Diaphragm
3. Vacuum Slide
4. Vacuum Port
5. Needle Jet
6. Main Air Jet
7. Main Jet
8. Slow Jet
9. Idle Mixture Adjustment Screw
10. Throttle Plate
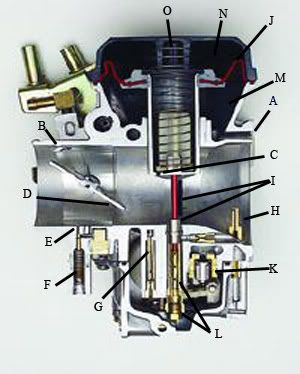
Here's a true cutaway of a CV carb for comparison.
This will show at what throttle position that the fuel circuits are most effective...

This graph shows how the different fuel circuits overlap and where they fall into the fuel delivery of the CV carb...
No jet acts independently of the others but rather they work together to deliver gasoline to the engine. They do however target specific throttle openings and have the most effect is that area.
The air screw is most effective between idle through 1/8 throttle.
The pilot (slow) jet is most effective between 1/8 through 1/4 throttle.
The slide valve is most effective between 1/8 through 1/2 throttle
The jet needle is most effective between 1/4 through 3/4 throttle.
The main jet is most effective between 3/4 through wide-open throttle..
IDLE: Set idle speed to proper r.p.m. by adjusting the IDLE SPEED SCREW. Turn the IDLE MIXTURE SCREW to achieve the highest steady speed and best response usually found at 2 1/2 to 3 turns open and fully warmed up. After adjustment has been made reset the IDLE SPEED SCREW to the proper r.p.m.
OFF IDLE to 1/4 THROTTLE: The SLOW JET and AIR SCREW are most effective in this range When you want a richer mixture use a larger SLOW JET or turn the AIR SCREW out. The opposite holds true for a leaner mixture keeping in mind that the air screw shouldn't be much more than 2 1/2 turns open. If it is then a jet change would be in order. Too large of a low jet will result in NO adjustment on the idle mixture screw.
1/4 to 3/4 THROTTLE: The JET NEEDLE is the most effective component in this range. Raising the needle by lowering the chip position at the top of the needle will richen the mixture. Lowering the needle will lean the mixture.
WIDE OPEN THROTTLE: Changing the MAIN JET affects this range. Select the size which offers the best wide open throttle. performance, then install one size larger MAIN JET for ideal engine durability.
Quick and easy way of testing the main jet size.
Run the bike through the gears into third gear and run third up to 60-70 MPH full throttle, then chop the throttle about 1/8 to 1/4 back and see if the bike either surges ahead or stumbles then recovers.
If it surges ahead, your jetting is lean
If it stumbles and recovers , your jetting is rich
If it makes no difference, you're pretty close.
This will give you an idea of the adjustable jet needles and how to richen up the mixture.
Using the stock jet needle, you shim it up with 2 - #4 washers under the head to raise it up in the slide. The stock needle does not have the grooves for adjustment.
If the bike pulls harder at high rpm when cold and less hard when fully warmed up, the main jet is too large. Install a smaller main jet and retest until you find the main jet that pulls the hardest at high rpm when fully warmed up. This must be done first - before moving on to the other tuning ranges.
If the bike doesn't pull well at high rpm when cold and gets only slightly better when fully warmed up, the main jet is too small.
In order to properly tune the mid range and low rpm mixtures, THE MAIN JET MUST FIRST BE PROPERLY SELECTED after 10 to 15 minutes of hard use!
Do not pay too much attention to the low-end richness when you are changing main jets - you still need to be using the main jets that produce the best power at high rpm. You will deal with the low-end / cruise later .
Here's a video on how to change the jets...
YouTube - Harley Davidson CV Carburetor Main Jet replacement‏
A tried and true for "most" carbs in twin cam bikes for rejetting with intake and exhaust mods would be on the low speed jet 45/46 (46 being the best usually), and on the high speed jet would be 185/190 (190 usually being stock). Install 2 - #4 washers (available in most hardware stores) under the main jet needle to raise it up .050 (see detail below), and readjust the idle mixture to the highest and steadiest setting, usually found about 2 1/2 to 3 turns open after LIGHTLY seating it and backing it out. This is done after the removal of the concealment plug that covers the idle screw from the factory. Care should be taken when drilling a hole to remove this concealment plug because if the drill goes through the plug and contacts the screw, it can turn the screw in and bottom it out damaging the seat of the mixture adjustment. All adjustments to mixture should be made at full operating temps. This mod will set you back about $4-$5 total..
The #46 jet is hard to find , here's a link if you need it...
Pilot Jet #46 for Keihin Carb PN 400-861
Here's a listing for the other size pilot jets too...
Motorcycle Jets J&P Cycles
This can be done without removing the carb by rotating it slightly for better access to the screws and works best with a stage 1 intake kit. Using the stock air cleaner would cause a rich condition with this procedure.
Refer to the other CV Carb posts in this area for more info and pictures of the carb to help you out here.
The installation of the washers is an easy thing to do and is pretty much straight forward. It just takes a little patients to seat the diaphragm back into the groove when you reassemble it. No experience needed, just straight forward common sense using a light handed circular motion to gather it up and drop into the groove in the carb body, You'll feel it drop in when you do it .The washers go under the ring on the needle after lifting it out of the diaphragm to raise it up in the assembly as seen in the pic at the bottom here .
I prefer not to drill the vacuum port in the slide. It can cause pop backs under certain conditions in cold weather and low RPM's.Also slide spring replacement for a weaker one or cutting the original one is also optional here.
I prefer this method to replacement of the main jet needle as not all know how to determine which needle would be the best for their application and it eliminates the guesswork. It also does not require dyno runs to validate the results. It works in most cases as a cut and dry method of getting a seat of the pants improvement without the time and expense of the DJ carb and other kits at $60-$100 and does not kill your MPG like the kits or sporty needle has done.
Some people decide to use the sporty needle # 27094-88 in their upgrade. These are my feelings on doing this. That needle comes from a carb that had NO accelerator pump and when you install it in a carb that does have an accelerator pump, it for sure will give you more fuel when you get into the accelerator circuit, but I feel it gives you too much fuel at that time and that's why I prefer the shimming with washers against the replacement of the needle to the sportster needle. The taper of the stock needle is more condusive to better mileage than the sporty needle is and if you were to ride two identical bikes with the two different setups, you really could not tell the difference.
This is how it works.
1. Slide Spring
2. Slide Diaphragm
3. Vacuum Slide
4. Vacuum Port
5. Needle Jet
6. Main Air Jet
7. Main Jet
8. Slow Jet
9. Idle Mixture Adjustment Screw
10. Throttle Plate
Here's a true cutaway of a CV carb for comparison.
This will show at what throttle position that the fuel circuits are most effective...
This graph shows how the different fuel circuits overlap and where they fall into the fuel delivery of the CV carb...
No jet acts independently of the others but rather they work together to deliver gasoline to the engine. They do however target specific throttle openings and have the most effect is that area.
The air screw is most effective between idle through 1/8 throttle.
The pilot (slow) jet is most effective between 1/8 through 1/4 throttle.
The slide valve is most effective between 1/8 through 1/2 throttle
The jet needle is most effective between 1/4 through 3/4 throttle.
The main jet is most effective between 3/4 through wide-open throttle..
IDLE: Set idle speed to proper r.p.m. by adjusting the IDLE SPEED SCREW. Turn the IDLE MIXTURE SCREW to achieve the highest steady speed and best response usually found at 2 1/2 to 3 turns open and fully warmed up. After adjustment has been made reset the IDLE SPEED SCREW to the proper r.p.m.
OFF IDLE to 1/4 THROTTLE: The SLOW JET and AIR SCREW are most effective in this range When you want a richer mixture use a larger SLOW JET or turn the AIR SCREW out. The opposite holds true for a leaner mixture keeping in mind that the air screw shouldn't be much more than 2 1/2 turns open. If it is then a jet change would be in order. Too large of a low jet will result in NO adjustment on the idle mixture screw.
1/4 to 3/4 THROTTLE: The JET NEEDLE is the most effective component in this range. Raising the needle by lowering the chip position at the top of the needle will richen the mixture. Lowering the needle will lean the mixture.
WIDE OPEN THROTTLE: Changing the MAIN JET affects this range. Select the size which offers the best wide open throttle. performance, then install one size larger MAIN JET for ideal engine durability.
Quick and easy way of testing the main jet size.
Run the bike through the gears into third gear and run third up to 60-70 MPH full throttle, then chop the throttle about 1/8 to 1/4 back and see if the bike either surges ahead or stumbles then recovers.
If it surges ahead, your jetting is lean
If it stumbles and recovers , your jetting is rich
If it makes no difference, you're pretty close.
This will give you an idea of the adjustable jet needles and how to richen up the mixture.
Using the stock jet needle, you shim it up with 2 - #4 washers under the head to raise it up in the slide. The stock needle does not have the grooves for adjustment.
If the bike pulls harder at high rpm when cold and less hard when fully warmed up, the main jet is too large. Install a smaller main jet and retest until you find the main jet that pulls the hardest at high rpm when fully warmed up. This must be done first - before moving on to the other tuning ranges.
If the bike doesn't pull well at high rpm when cold and gets only slightly better when fully warmed up, the main jet is too small.
In order to properly tune the mid range and low rpm mixtures, THE MAIN JET MUST FIRST BE PROPERLY SELECTED after 10 to 15 minutes of hard use!
Do not pay too much attention to the low-end richness when you are changing main jets - you still need to be using the main jets that produce the best power at high rpm. You will deal with the low-end / cruise later .
- To get the best power at full throttle , adjust the needle height, after you have already selected the best main jet.
- If the engine pulls better or is smoother at full throttle in a full throttle roll-on starting at 3k when cool but soft and/or rough when at full operating temperature, it is too rich in the mid range and the needle should be lowered.
- If the engine pulls better when fully warmed up but still not great at full throttle, try raising the needle to richen.
- If the engine pulls equally well between 4k-5+k when cooler as compared to fully warmed up, the needle height is probably properly set.
Last edited by a moderator:
