free website stats program 03 night train, won't idle, coughs and backfires. | Page 2 | Harley Davidson Forums

03 night train, won't idle, coughs and backfires.

Update. After stepping away from the bike for awhile. (You have to do that sometimes) I sprayed some gumout in the low and main ports. Then blew some air thru. She runs like new again. Thanks guys.
 
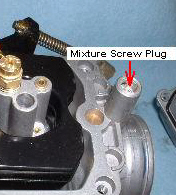
Jack. The exploded view of the carb is great, but identifying each numbered part would be really nice. Anyway that you can post the key for that drawing? Specifically, I'm looking for the idle air mixture screw. I would like to take it out and clean out the ports, etc. It seems logical since I have to give it half choke to keep it running, that it isn't getting fuel on the idle circuit.
WAP.gif

mixture_screw.jpg
If your carb has not had the welsh plug removed you will have to do that first

You can safely do this on the bike by rotating the carb slowly in the spigot go slow and if you have someone that can hold the carb that will be a BIG plus, I have done them this way
The CV style Harley carburetor has a small cylindrical tower protruding from the bottom rear of the spigot (behind the bowl). The tower is plugged with a soft metal insert covering the mixture screw. Gaining access to this screw is key to fine tuning and must be remove. The metal plug is very soft and only requires a household drill and 7/64? to 1/8? bit.


Secure the carb in either a vise or by other means that will allow the carburetor to remain steady. Drill a hole into the plug making sure not to “punch” through too fast. You don’t want to damaged the mixture screw just below the plug. Allow the drill to slowly cut into the plug rather than push.
Tip: To keep from drilling too far into the plug, it has been suggested to wind electrical tape around your drill bit quite a few times about 3/16? from the tip. This will create a stop to keep the bit from drilling too deep.


Pry the plug out using a pick or awl. You can also thread a sheet metal screw into the drilled hole and use this to pull the plug out. Now that the plug is removed clean the area around the mixture screw so no metal fragments remain. At this point there are two methods for adjusting the mixture.


Adjustment Method: Using a small flat head screwdriver turn the screw clockwise until it gently seats. DO NOT OVER TIGHTEN AS THIS WILL DAMAGE THE NEEDLE SCREW. Count how many turns it takes to reach the closed position. Mark the screwdriver if needed to properly count each turn. Now turn the screw out counter clockwise stopping at a 1/4 turn beyond that which you originally counted. For example, it you turned the screw in 1-1/2 turns then unscrew it 1-3/4 turns. This is your base starting point and alone will allow your idle mixture to be slightly richer than the factory’s EPA setting. In many cases this will be the ideal setting.
 
Update. After stepping away from the bike for awhile. (You have to do that sometimes) I sprayed some gumout in the low and main ports. Then blew some air thru. She runs like new again. Thanks guys.

Good move; however, if you haven't removed the A/F adjustment screw I would do that to be on the safe side. If there is any "debris" still floating around the system it could find it's way to that low speed circuit and start causing problems again. There is also a rubber o-ring at the tip of the screw which should probably be replaced after storage. I would also pull the emulsion tube and make sure all those holes are open.

Harley carburetor parts from CV Performance
 
The VOES was replaced with a MAP sensor on the twin cams. I would certainly pull the carb, disassemble, clean, set float level. If the A/F adjustment screw is still behind the plug, remove the plug so you can play with the A/F adjustment. If that doesn't correct things, pull the CPS and check for gunk.

What he said. It isn't rocket science, with a mediocre tool kit. This is easy.
 
Back
Top