free website stats program Front exhaust pipe removel | Harley Davidson Forums

Front exhaust pipe removel

postie357

Member
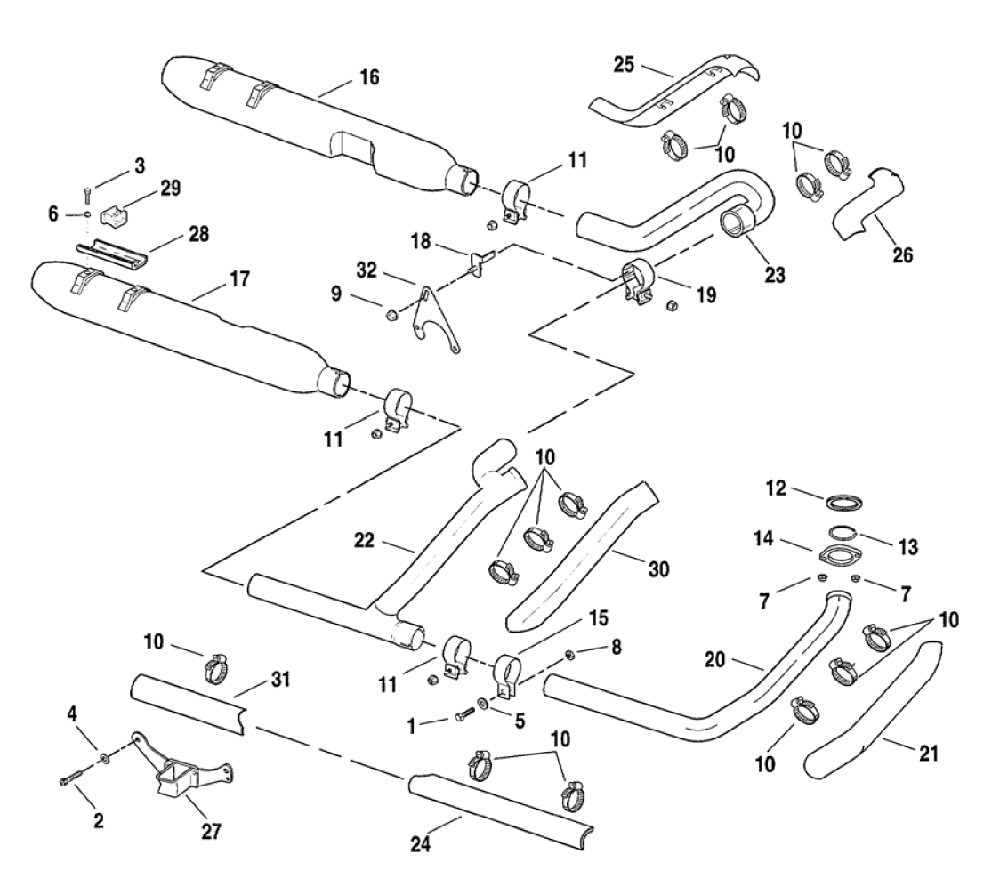
I have 2000 Road King with stock pipes and slip-ons. I want to check the cam chain tensioners. The cam cover won't slip off past the front exhaust pipe. I have taken the flange nuts off (surprisingly easy), the heat shields and mounting brackets. The front pipe will not slide out of the Y pipe. Is there something I'm missing or do I need to remove the whole exhaust system?
Thanks John
 
I usually take off the entire exhaust. That way I can clean joints up for easy replacement. I will put Anti Seize Hi-Heat on the joints. It helps.
tourbox
 
Removing exhaust usually requires a lot of twisting and pulling. Exhaust studs may need to be removed to get twisting room. I've not taken only the front head pipe off, but I think there is just enough room to clear the frame. I just had mine apart 3 weeks ago, and removing the right footboard gave me more room. You have loosened the torca clamp in front of the "Y" connector? The slip fit may be seized up with carbon, and need some PB blaster or other strong solvent. In the long run, it may be easier/faster to take the whole right side off.
 
I have usually started at the back and worked my way forward on my 00FXDS... Taking ALL off.

STILL the SAME problem on the newer bikes of today...

signed....BUBBIE
 
I would dis connect battery or remove it while doing this project so there are NO surprises:D
 
While I think tourbox has the best approch here, I've taken the whole right side off alone split at the Y (just did it-I'm in the process of cam tensioner upgrade thing also).
Need right floor board off for sure. I also loosened clamp bolt above the starter. then some wiggling and pulling to separate Y from left side-------yes, easier said than done. I've also had mine apart before so it may have been easier for me.
It's probably best splitting the Y joint from left before right side is loosened at all.
 
+1....take the left side off first splitting it at the Y before you even begin to loosen anything on the right except for the Torca Clamp which I removed. I then used PB Blaster for a couple of days before trying to split the rear head pipe from the front. It was a pain and took some wiggling and colorful language to get apart. As tourbox stated, i then used copper anti seize when re-assembling for a hopefully easier dissasembly the next time I need to remove the exhaust. Ohh...and my Y pipe was split/cracked which is common and needed to be replaced. I didn't bother trying to have it welded as most fail again within a few thousand miles.
 
I cut mine off & installed true duals , dont have to mess with a y pipe then . Its a real pain trying to take all those connections apart .
 
To BigAl66 and anyone else with a broken Y-pipe. Check for a damaged or broken front motor mount, a broken front engine mount plate bolt, a loose compensator nut and or anything that would cause the engine to have a rough idle resulting in an engine that shakes more than normal. Around the 70 to 75K miles my dealer told me my cracked Y-pipe was why my engine idled rough. The noise I was hearing was my primary chain out of adjustment. My front motor mount and fairing brackets were replaced around 75K. Around 80K I opened up the Primary to find a worn out primary chain (previous owner didn't know he had a leak in the primary), a broken primary adjusting shoe, and a compensator nut that was about one turn from losing contact with the compensator. Anyway there are several reasons why y-pipes crack. The y-pipe was welded on the bike about 38k miles ago with an oxyacetylene torch and a mild steel coat hanger for a welding rod. At the time of the weld the crack grew when the heat was first applied to the pipe. The welds were extended well past the ends of the cracks. In the time since I haven't noticed any signs of a crack returning. hope to be checking the cam chain tensioners and the y-pipe in the next month. The engine idle and overall smoothness were greatly improved after the primary chain and adjuster were replaced and the comp nut and engine shaft were properly cleaned prior to applying red locktite when reassembled.
 
HD00FLHTC059.gif
Number 32 in this picture is from what remember being one of the main reasons the rear pipe crcaks, the mount cracks and the nuts that hold it on at the starter have been known to vibrate off
 
Back
Top